Showing posts with label weaving projects. Show all posts

Wednesday, December 11, 2019

In the Art Room: Weaving with First Grade

Teaching weaving was one of those things I dreaded my first year teaching. I got a C on a weaving project in college because I was certain that my professor would never notice that I'd missed a warp string, causing a large runner to snake it's way through my weaving. So when I saw weaving in my curriculum, I was not thrilled. 

It also didn't help that I had a first grade boy shout, "I'm NOT WEAVING. It's FOR GIRLS."

Here's the funny part: days later, he was the best weaver in class and years later, I wrote a book on fiber arts for kids. Go figure! 
Last week, my first graders and I spent a couple of art classes learning about abstract art. We enjoyed listening to Peter and the Wolf while using our oil pastels to create a line for each character in the symphony. The following day, we listened to the whole record while using watercolor paint to create. You can see a similar lesson here. And if you'd like to see the lesson I taught for abstract painting last year, here you go:
After our day of painting, we turned our paintings into looms for weaving. Here is how we did just that:

 If you would prefer to see more of a blog post on this, visit this! Also, this video might show more about paper weaving:
Or this!
When introducing weaving, this giant paper loom comes in so handy! I made it years ago from laminated bulletin board paper. 
And in just 30 minutes, my students had completed their weavings! It was a record!
 I love them with their abstract paintings. Now...dreaming of ideas of where we take these next. 
I've done a variety of weaving lessons with paper weavings from owls to hearts. Be sure and click on those links for more ideas!


 photo signature_zpsd10b3273.png
Read more »

Tuesday, January 30, 2018

How to Teach Paper Weaving!

I'll never forget my first year teaching. It was: wonderful, traumatizing, exciting, nerve-wracking and, most of all, a HUGE learning curve! I'll never forget seeing "weaving" in my first grade curriculum and breaking into a sweat. I'd gotten a C in fibers in college (which is so funny as fibers are my favorite thing!) BECAUSE OF MY WEAVING! When warping that big ole loom, I missed a couple of warps. Instead of going back and fixing my mistake, I thought, "eh, that professor will never notice." Little did I know that it'd leave a huge run all the way down the length of my weaving that seemed to scream, "THIS SLACKER DESERVES A C!" And a C I got.

I remember introducing weaving to my first graders that year and a boy named Jonathan shouted out, "Weaving's for GIRLS and I ain't doing it!" It was then that I realized I had to make weaving (and teaching in general) fun, silly, wacky and engaging. For all my learners, boys and girls. The thing is, he turned out to be my best weaving and biggest fan of the medium. As most boys do!

Introducing kids to weaving is something that I've been doing now for 18 years...and this lesson hasn't changed all that much. I read the same book, show them how to make a loom on the first day and we weave on the next. I know so many teachers struggle with weaving. The key is, introducing them to weaving with a simple paper weaving. Once they understand the concept, they'll take off like a weavin' rocket ship. 

I thought I'd record my two thirty minute classes. Here's what we did on the very first day: creating our looms!
Here are some must-have visuals that I always use: thrift store weavings and looms; my GIANT paper loom made from laminated paper; my Goat in the Rug book.
I also love having the roving for the kids to see and touch. Normally, I'll pass it around but I had forgotten to check with the nurse for allergies so I held off on this day.
This here is my FAVORITE book on weaving and the kids absolutely love it! After we create our looms, we sign them and await the following day's weaving adventure:
If you'd like more info on paper weaving, you might enjoy this video. It will explain the process more:
Here's how we went about cutting our looms and how I explained it...

I'll keep you posted on just what we are doing with our weavings...I'm really excited and cannot wait to share. I have a TON of weaving projects both on my YouTube channel (just search my Fibers playlist) and right here on my blog. Happy Weaving!
 photo signature_zpsd10b3273.png
Read more »

Wednesday, January 21, 2015

In the Art Room: A Woven Clutch

Welcome to the season finale of the Weaving Series, y'all! I do hope that you've enjoyed this little trip down weaving lane as much as I have. I know I was always super stressed about teaching kids this craft when I didn't feel so confident myself. I'm hoping that these posts, videos and avalanche of photos have been useful for you. Here's a recap of all the posts from this series:

The Weaving Series: Paper Loom Weaving (perfect for first grade)
The Weaving Series: Straw Weaving (second grade and up)
The Weaving Series: Circle Loom Weaving (second grade and up)
The Weaving Series: CD Loom Weaving (second grade and up)

The Weaving Series: Ojo de Dios (second grade and up)
 
The Weaving Series: Tree Weaving (third grade and up)

So, I'd love to hear from you! Have you given any of these projects a go? Did you find the videos useful or are step-by-step photos your preference? If I do another series, what would you be interested in? Thank you so much for the feedback, guys!
Today I'm sharing with you a woven clutch project that is just perfect for those kids in fourth grade and up. It brings together all of those skills learned from previous weaving experiences however it's simple enough for those that have never woven before to do. 

A while back, I shared a series of posts that detail how to weave a basic pouch. You'll definitely want to start here if you've never created a woven pouch before. In this post, I'm going to show you how to get fancy with your pouch (btw, I have a habit of calling these creations a "pouch" for fear that I'll drop the "purse" bomb in front of a class of boys. And you know what that would mean: Game.Over.) So, follow these links to begin your pouch then c'mon back for some fancy stitchin':

Pouch Weaving, One: Getting Started
Pouch Weaving, Two: Weaving the Flap
Pouch Weaving, Three: Removing the Weaving
Pouch Weaving, Four: Weaving the Cord

So in today's post, Ima gonna show you how to do a little tapestry weaving along with creating a buttonhole and a checkerboard pattern.
Just to be a brag-a-saurus for a pinch, can I just tell you how much I love the back of this clutch? It took me a while (weaving with fine yarn was prolly not the smartest move) but I love the way it looks...and I'm already dreaming up my next woven clutch! Lemme show you how I created this triangular tapestry.
For this, you'll be using a dovetail tapestry stitch. For me, this entailed weaving with four needles at once (confusing? kinda. But for those middle and high school kids, def doable): two needles of brown yarn for the sides and two needles of pink for the triangles on either side of the clutch.
I found this super groovy 1970's craft book which had these super groove diagrams of all the stitches. This is a close up of what that dovetail woven stitch looks like. 
I wove this guy a couple years ago with some funky yarn. While I think the end result was cool, weaving with that stuff is a headache. For your first go, I'd definitely use regular yarn.
You can see a different take on that dovetail weave here. 
Now, let's talk buttonhole. That was simple. I really like simple. That checkerboard pattern? Gave me 5 new gray hairs and a migraine. Mostly cuz I wasn't doing it right for the longest time. In this clip, I'll show you how it's done (bear with me, it's confusing):

Here's a peak at what the buttonhole weave looks like. You're just creating an opening. Cake.
And here's that confounded checkerboard weave. Oui. It's not hard it's just confusing for the small minded like myself. 


The cord is by far the most fun and simplest thing to create. My kids love creating these! We turn them into bracelets, belts and, of course, the strap for our clutch. I've created these cords with kids as young as second grade. 
To attach the cords, I usually hand sew them to the side of the pouch. On my larger clutch, I first stitched a figure-eight around the base of the cord before hand sewing it to the clutch. I'm so happy with these little guys! And I know you and your students would be as well.

DISCLAIMER, SHAMELESS SELF-PROMO: Y'all. If you've not voted for your fave art ed blog, would you mind taking a moment to do so? There's some fantastic ones and my crazy blog is in the mix (in the "Wild Card" division). If you'd be so kind to cast your vote (you can vote for as many blogs as you like), that'd be just swell. Here's the link. 
And there you have it! The season finale of The Weaving Series! I do hope you enjoyed this woven adventure. 
 photo signature_zpsd10b3273.png
Read more »

Tuesday, January 13, 2015

In the Art Room: God's Eye (Ojo de Dios)

Hey, guys! Can I just say how happy y'all have been making me? I've heard from so many of you that are weaving in your art room and beyond (I'm actually working on a weaving outside of the art room too, I can't wait to share that with you!). Thank you so much for your emails with helpful tips, tricks and projects as well as all the weaving love! Y'all are seriously the best.

Today I thought I'd share with you a weaving project that is great for a coupla reasons which I shall share with you in glorious bullet points as I'm feeling very bullet-pointy:

*  First, it can be as easy or as difficult as you decide to make it. Weaving a basic God's Eye is simple but Ima gonna show you some that'll blow your mind. 

* Second, it's a great project for those early finishers that still have the weaving itch. I use much of the same weaving terminology when explaining it to the kids which not only reinforces vocab but also helps the process click even more.

* You can throw in some culture and contemporary art while you're at it! The Ojo de Dios was originated by the Huichol people of western Mexico. Originally, they were created when a child was born. Each year, a new layer of yarn was added to the weaving. Once the child turned 5, the weaving was complete and hung in the child's home. It's believed to be the eye of God watching over and protecting the child. Cool, right?!
My kids have thought so. This weaving was completed by a third grader just this afternoon! I shared with the kids a wonderful God's eye I'd found at the thrift store and they were interested in embellishing theirs further. This worked out perfectly during art class as I had several kids finishing off other projects. 
So a traditional Ojo de Dios looks like this. I scored this beauty for a coupla bucks at the thrift store. The kids were so inspired by it today!
However, weaving Ojo de Dios isn't limited to the Huichol people. There are many contemporary weavers creating stunning versions. I'm so inspired by these beauties by Jay Mohler that I'm thinking of creating my own! Has anyone every tried their hand at this kind of weaving? I'd love to learn more. 

So, just how does one go about creating a simple Ojo de Dios? I created a coupla clips for you! So, get your kitten mittens on some sticks (or straws as I'll show you in the clip) and let's get started!
In my room, we didn't use straws but various sticks glued together. Like popsicle sticks, chop sticks and toothpicks!

The weaving comes together very quickly. You'll be surprised how fast and fun these weavings are!
 I mean, the majority of these were completed in one art class! These were created by my third grade kids.
 And these are by my second graders! We added brass bells to the ends of our weavings with Twisteez wire. A paper clips was hot glued to the top so that they could be easily hung for display. 

Popsicle sticks are the perfect thing for first time weavers. The flat surface of the stick gives the kids plenty of room to number each stick (see video clip for complete details). And, for some reason, I found that the kids grasped the process of weaving much better on these sticks as opposed to other sticks. I've no clue why. Whatcha y'all think about that? A kid-mystery, says me.
 I just wanted to give you a sneak peak at the backside. The front and the back of the weavings look very different. I stress that to the kids over and again. This is the key to knowing whether or not you are doing it correctly. Again, if you watch the clip (they're short, I promise), you'll get what I'm saying.
I'd love to hear about how your weaving adventures are going! Have you had your kids create Ojo de Dios before? What tips and tricks do y'all have?

For more weaving goodness, feel free to check these posts out, y'all!

The Weaving Series: Paper Loom Weaving (perfect for first grade)
The Weaving Series: Straw Weaving (second grade and up)
The Weaving Series: Circle Loom Weaving (second grade and up)

The Weaving Series: CD Loom Weaving (second grade and up)

 photo signature_zpsd10b3273.png
Read more »

Thursday, November 13, 2014

In the Art Room: Mexican Sun/Moon Weavings

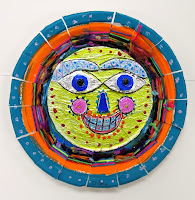
You know, as an art teacher, I just can't seem to teach short and simple lessons. I ain't braggin'. It's a real problem. I mean, what you are looking at here took us 4 weeks of art class to complete (that'd be 4 hours). What with the metal relief, the coloring, the puffy painting, plate painting and weaving, I thought the entire thing would never end. However. Looking through the stacks of these masterpieces and reading the kid's artist statements about their work (as well as the sweet notes that my second grade kids wrote them about their artwork), I like to think it was all worth it. That being said, you had better believe our next project is gonna be, well, less than four weeks. Like, maybe three and a half.
So just how did this whole project come to be? Well, I go the idea for the metal design from Denise Logan in her book and on her website, she shares the lesson of creating a Mexican sun. I love her lesson but decided to take the process one step further by adding the woven edge. This is the same group of fourth graders that created these stitched creations. Their fingers were itching for more fibers arts so I thought, why not give the kids what they want?
The process for the sun/moon plate was much like the one my third grade students created for their dots. To begin the project, on our first day, we reviewed what we new about Mexico with this prezi. Then, I introduced the ceramic work of the artists in Metepec, Mexico with this prezi
After that intro, the kids were given this sketching sheet to hash out some ideas. I set my Time Timer for 7 minutes and told them to meet with me again when the timer went off. 
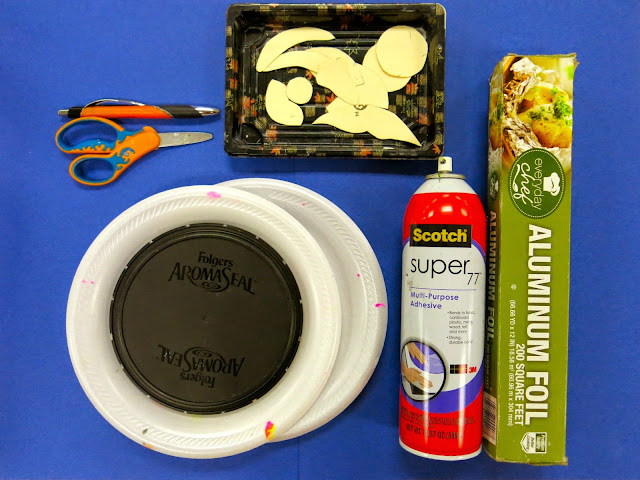
 By the way, here's a lil shopping list for you:

  • Cheapo Styro Plates. I mean the really cheap kind. Two for each kid.
  • Cheapo Foil.
  • Spray Glue. 3M's my jam.
  • Ink Pens. They work best on styro as they don't cut into it like pencils.
  • Face Template. Hate me if you wanna, we used facial parts to trace for those who didn't feel confident in drawing their own facial pieces.
  • Circle Temple. 

Once the timer went off, we met again to talk about how to make our sketch a reality. First step, cut out two circles. One will be for the face the other, the parts.
Trace template pieces or create your own template pieces on your sketch paper. Cut those out and trace around them. I discouraged the kids from sketching directly on the styro as they couldn't erase those lines.
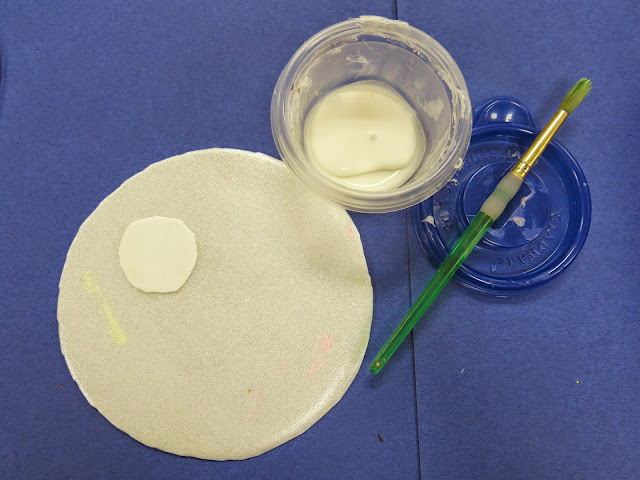
 Start gluing those pieces in place. By the way, I don't use glue bottles in my art room as they are the Root of All Evil (I remember the moment I saw a child attempt to use the blade of a brand new pair of scissors to unclog a bottle whilst another proceeded to bust off the tip of his pencil lead during his stabbing/unclogging attempt. Forever after that, it's been glue in a cup and paint it on.) 

This was about all we managed on that first day. Each kid was given an envelope to put their pieces in for the following art class.
 During our second art class, the kids finished cutting out and gluing pieces. The kids could decide if they wanted to make a sun, a moon or a combo of both. When they were finished, they came to see me at the Super Amazing Spray Glue Table where I spray glued their work and placed foil atop. IF they wanted a sun/moon, I sprayed their styro face and gave them yarn to lay on top however they wanted it.
Massage the plate but do not use your fingernails. That will tear the foil and make for a super sad art teacher. 
From there, color was added with Sharpie. Now, I did have to make one muy importante rule: The background of the face needs to be ONE color (unless it's a sun/moon). Here's why I did that: I noticed the kids were picking colors at random and they were losing the face completely. I told them that the raised pieces could be any color they wanted but that the background was to be one solid color. No one's creativity appeared to be crushed during the enforcement of that thar rule. 

Once coloring was complete, the kids entered Puffy Paint land. WHICH they loved, according to their artist statements. 
 During our next art class, the kids painted the outer edge of a large Chinet plate (I suppose if you wanted a shorter project, have the kids create smaller faces and use smaller Chinet plates? Just a thought). That only took them 15 minutes which gave them more time to finish their coloring and puffy painting from the previous class. I did have a couple early finishers who began our next project: Ojos de Dios!
 The following class, the paint had dried so the kids cut their plates and started weaving. I gave the kids a template with 19 notches cut into it. They laid the template on their plate, cut the notches and started to weave. I do a weaving project every year with my students so a quick reminder that weaving is over and under and they were off running.
Me: Oh my goodness, I love your sun/moon! Can I ask what's on her lip?

Student: She has one of those sores that I get in the winter.

Me: Um, like, a cold sore? 

Student: Yeah, that's it! I wanted her to have a cold sore.

(OMG, I die.)
Once the kids wrapped up their weaving, they were to write an artist statement. We chatted about how we could either write about the process, the product or something we learned. Once those were complete, they were glued to the back of the weavings. Reading those statements was hilariously enlightening.


So apparently the kids like puffy paint. I did have several kids write about something called "puppy paint". Um, what?! Do they think I'm so cruel that puppies were harmed in the making of said paint?! Guess we need to have a chat. OR I need to do a better job enunciating. 
My school district is joining in on a Be Nice Campaign. The kick off was this week. So I decided to have a weekly Give Nice a Try post in my art room. Sometimes we'll have time to give it a go in the art room...however, often times, I'll be counting on the kids to do this on their own time. This week, it worked out for my sweet second graders to write a nice note to the fourth grade about their finished pieces. 
Here are the second graders writing their nice notes to the fourth grade.
 
I double checked all notes before giving them out to the fourth grade. I wanted to be sure they were nice. This one was especially sweet.

The fourth graders were pretty stoked to get feedback about their artwork. I had them write thank-you notes to their new second grade friends. This note really showed the impact of our letter writing campaign. 
And there you have it! Even though this project took us forever, did involve relief sculpting, Sharpie coloring, painting and weaving (oh, and puppy paint, ha!) all while learning the history of the Metepec suns of Mexico. What's your fave long-winded art project? Please tell me I'm not the only one with million-year art projects, y'all!
 photo signature_zpsd10b3273.png
Read more »